TOR+Privoxy minimal setup for DGN2200v3/MIPS architecture
Anonymizer Anonymous Surfing Dgn2200v3 Embedded Linux Linux Desktop Linux Embedded Mips Security Teaching Material The Onion Ring TOR Transparent Proxy
5 minutes
In a previous article I talked about how to customize the Linux based WLAN+ADSL Netgear DGN2200v3 router and prepared various binary packages ready for the device. In this short article I’m offering a small full setup that can be run on this router (and many other compatible ones and in general on any MIPS+uClinux hardware setup) to be able to use easily the TOR network to browser anonymously. In this way all the users behind the router can easily achieve anonymous surfing.
To achieve the minimal setup to use the TOR network two components are needed:
- The TOR software itself, which is “the onion router” that routes the packets through the TOR network and presents a SOCKS interface to local applications.
- A HTTP proxy with SOCKS forwarding capabilities to make the operations easier for browsers users. The HTTP proxy used will be Privoxy
The crosscompiled packages were version 0.2.3.25 for TOR and 3.0.21 for Privoxy. Crosscompiling the packages wasn’t a very big deal (TOR has a few dependancies to be added such as OpenSSL and libz, Privoxy is even easier just take care of a little trouble with uClibc documented here). You can follow some instruction on how to do this on this older post of mine. The produced binaries can be downloaded here: tor-0.2.3.25+privoxy-3.0.21-dgn2200-bin.tar.gz (MD5SUM: df9547e5467954b921fa8d6b7da92780)
Once you transfer the binaries on your router you have to prepare at least some basic configuration. The binary package linked before contains a few sample files you can use.
TOR wise there isn’t too much to change if you’re not acting as a relay. Just make sure that the DataDirectory points to a writable portion of the filesystem (even better if it’s a non volatile one so the startup time in the next sessions will be much improved). TOR will save here keys and such files. If you’re acting as a relay you’ll have to configure quite some more parameters and make sure you also open with iptables the appropriate ports on your router configuration (see the article here on how to open a port on the external side).
Privoxy wise there are a few more things to configure:
-
directory containing the configuration files (and therefore also error templates and icons and such, also included in the binary package) with the confdir directive
-
directory and file for privoxy logs (logdir and logfile)
-
the IP address and port to listen to (listen-address). This should be your internal network IP address and your port of choice
-
telling privoxy to forward connections using socks to TOR. This is done with the formward-socks4a directive specifying also the TOR IP (usually should be the loopback IP) and port (default 9050). The directive should look like:
forward-socks4a / 127.0.0.1:9050 .
-
should you decide to use the TOR+Privoxy with a transparent (well Privoxy defines it as “intercepted”) proxy, that is the users will be automatically proxified without having to set anything up in the browser, you should enable this in privoxy with the directive
accept-intercepted-requests 1
-
there are really a lot more options you should check and use in Privoxy to make your browsing experience even more private. Give it a good read of the documentation and once you use it access the local web interface. In the binary package I also inserted the default user.filters and user.actions file which contain a template for very useful privacy filtering (such as refeerer stripping, popup disabling and a special mention of the fun filter). Make sure to analyze them and enable useful filters/actions on your installation. This can be also done via the Web interface if the enable-edit-actions is set to 1 as in the example file.
Once you have the two configuration files and after creating all the directories needed (where TOR/Privoxy will keep their configurations files) you can launch them both from the command line (or later from your favorite rc shell). While Privoxy by default forks in background as a daemon you have to manuall do this for TOR (so send it in background with the ampersand and eventually use the nohup tool included in one of the packs in the Netgear modifications article).
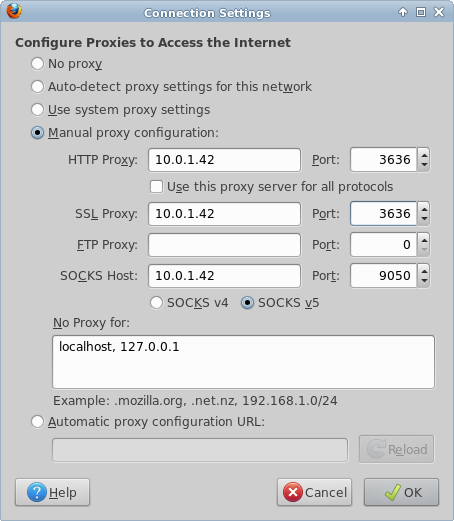
Now you should be ready to use the TOR system. Just configure your browser network settings to point for HTTP/HTTPS connection to the just configured service. For example if your router IP is 10.0.1.42 and Privoxy is running on port 3636 you should proceed as in the following screenshot:
 If everything went fine you should be now browsing using the TOR network. You can check the TOR checking service at https://check.torproject.org/ or use one of the various serices that notify/geolocalize the IP you’re connecting from.
As a last thing if you would like to automatically (that is transparently) proxymize all the requests going through your router with the Privoxy+TOR system just described you can easily do so by adding for example a simple rule like:
iptables -t nat -A PREROUTING -s 10.0.1.36/32 -p tcp --match multiport
        --dport 80,443 -j DNAT --to 10.0.1.42:3636
The example above assumes the router IP is 10.0.1.42 and Privoxy configured to run on port 3636 as before. All the traffic from the single IP 10.0.1.36 for both HTTP and HTTPS will be transparently passed via Privoxy+TOR.
You can of course activate the transparent proxying on your whole network by changing the source mask accordingly (for example 10.0.1.0/24).
Remember that Privoxy requires the accept-intercepted-requests activated if you’re using this iptables transparent proxy rule to work correctly.
If you don’t like the transparent proxy operation but don’t want to manually bother in your browser preferences and you’re using Firefox I’d suggest you the use of the FoxyProxy Firefox Plugin to be able to manage different proxies depending on your target HTTP connection or to switch them easily with a click.